Text Elements
Heading, Para, and Text elements in the builder TEXT panel — how each works and when to use it.
The TEXT section of the left panel has three elements: Heading, Para, and Text.
Heading
A bold title line. Choose from H1 (largest) to H6 (smallest) in the Properties panel.
Use case: Document title and section labels on an invoice
An invoice needs a clear title at the top and section labels to guide the reader. H1 sets the main document title, H2 marks each section such as Items, Summary, and Terms.
Steps:
- Drag Heading from the TEXT panel onto the canvas.
- Use a merge field or type the heading text. Type
{{Account.Name}}to pull the company name from the record automatically. - In the Properties panel, choose the heading level: H1 for the main title, H2 for sections.
- Optionally set font size and color in the Properties panel.
H1: {{Account.Name}}
H2: Invoice Summary
H2: Terms & Conditions
 H1 heading using
 {{Account.Name}} merge field, with H2 section labels below. Properties panel shows Heading Level set to H1.
Para
A block of text with spacing above and below. Use it for body content that needs its own line with breathing room.
Use case: Payment terms on an invoice
The payment terms section of an invoice is a block of readable body text. All lines go into one Para element — press Enter to move to the next line within the same block.
Steps:
- Drag Para from the TEXT panel onto the canvas.
- Use a merge field or type the paragraph text. Type
{{Opportunity.CloseDate}}to insert the close date from the record automatically. - Press Enter to add the next line inside the same Para. Repeat for each sentence.
- Optionally adjust font size in Properties: use smaller size for fine print, default for body text.
Payment is due within 30 days of {{Opportunity.CloseDate}}.
Late payments are subject to a 1.5% monthly interest charge.
For queries, contact {{Account.Phone}}.

Text
An inline text span with no block spacing above or below. Use it for labels, values, and short annotations placed alongside other elements.
Use case: Company address block on an invoice
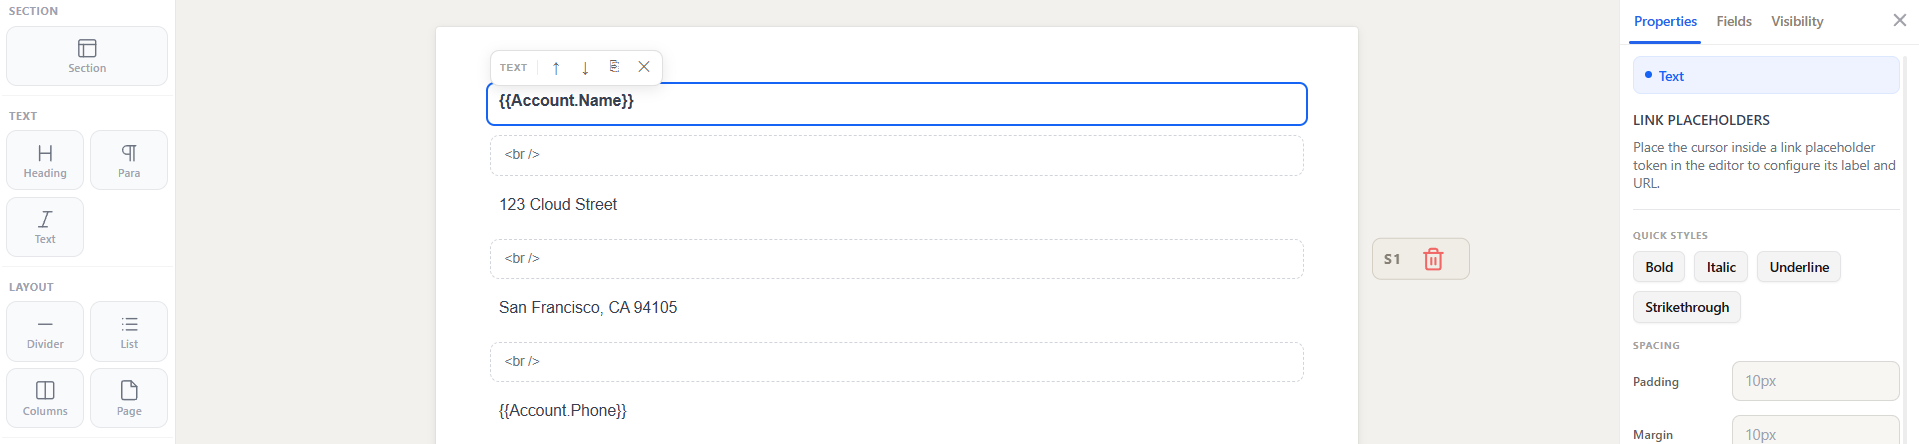
Address details (company name, street, city, email) need to stack tightly line by line inside a section. Text elements with Dividers between them give precise control over spacing without the extra margin a Para would add.
Steps:
- Drag Text from the TEXT panel into a section.
- Use a merge field or type the text. Type
{{Account.Name}}for the first line and bold it in Properties. - Drag a Divider below it to add a line break.
- Repeat for each line. Use a merge field where the value comes from a record, or type the text directly for fixed content.
{{Account.Name}}         ← Text (bold, merge field)
123 Cloud Street         ← Text (hardcoded)
San Francisco, CA 94105  ← Text (hardcoded)
{{Account.Phone}}        ← Text (merge field)
Tip: Use Para when the text needs its own block margin. Use Text when stacking tight lines that need minimal spacing between them.