Layout Elements
Divider, List, Columns, and Page elements in the builder LAYOUT panel — how each works and when to use it.
The LAYOUT section of the left panel has four elements: Divider, List, Columns, and Page.
Divider
Adds a blank line break (<br />) between two elements. It creates vertical breathing space without adding a full paragraph margin.
Use case: Add space between a company heading and its description
When a section has a bold company name at the top and a paragraph of description below, the two sit too close together by default. A Divider between them adds a single blank line to separate the heading from the body text cleanly.
Steps:
- Drag a Heading or Text element into a section. Use a merge field or type the company name. Type
{{Account.Name}}to pull it from the record automatically. - Drag Divider from the LAYOUT panel below it.
- Drag a Para element below the Divider and type the company description.
 Divider (
<br />) sitting between the {{Account.Name}} merge field heading and the description paragraph.
List
A bulleted or numbered list of items. Supports nesting up to 3 levels deep.
Use case: Services delivered on an invoice
An invoice needs to clearly show the client what was delivered. A bullet list makes each service a distinct line, easier to read than a block of text.
Steps:
- Drag List from the LAYOUT panel onto the canvas.
- In the Properties panel, choose the list type: Bullets (•) for unordered or Numbers (1.) for ordered.
- Use a merge field or type each item. Type
{{Opportunity.Name}}to pull the project name from the record, or type a fixed service name directly. - Click Add Item to add more. To add a sub-item, click inside an existing item and drag another List inside it.
• Salesforce CRM implementation for {{Opportunity.Name}}
• Custom Lightning Web Component development
• Third-party API integration (ERP and Payment gateway)
• Data migration from legacy system
• Admin and end-user training (10 hours)
 Bullet list with first item using
 {{Opportunity.Name}} merge field, remaining items hardcoded.
Columns
Splits a row into two or more side-by-side columns.
Use case: Company address left, client address right on an invoice header
An invoice header needs the sender's details on one side and the recipient's details on the other. Columns make this possible in a PDF. Both sides sit on the same horizontal line.
Steps:
- Drag Columns from the LAYOUT panel onto the canvas.
- The block opens with two equal columns (50/50) by default.
- Click the left column and drag Heading (H2) inside it. Type the sender company name directly. Add Text below for address, phone, and email as hardcoded lines.
- Click the right column and drag Text inside it. Type "Bill To:" and bold it. Add Text below using merge fields to pull the recipient details from the record automatically.
Left column (hardcoded):        Right column (merge fields):
Acme Group Pvt. Ltd             Bill To:
123 Cloud Street                {{Contact.FirstName}} {{Contact.LastName}}
San Francisco, CA 94105         {{Account.BillingStreet}}
billing@acme.com                {{Account.BillingCity}}, {{Account.BillingState}}
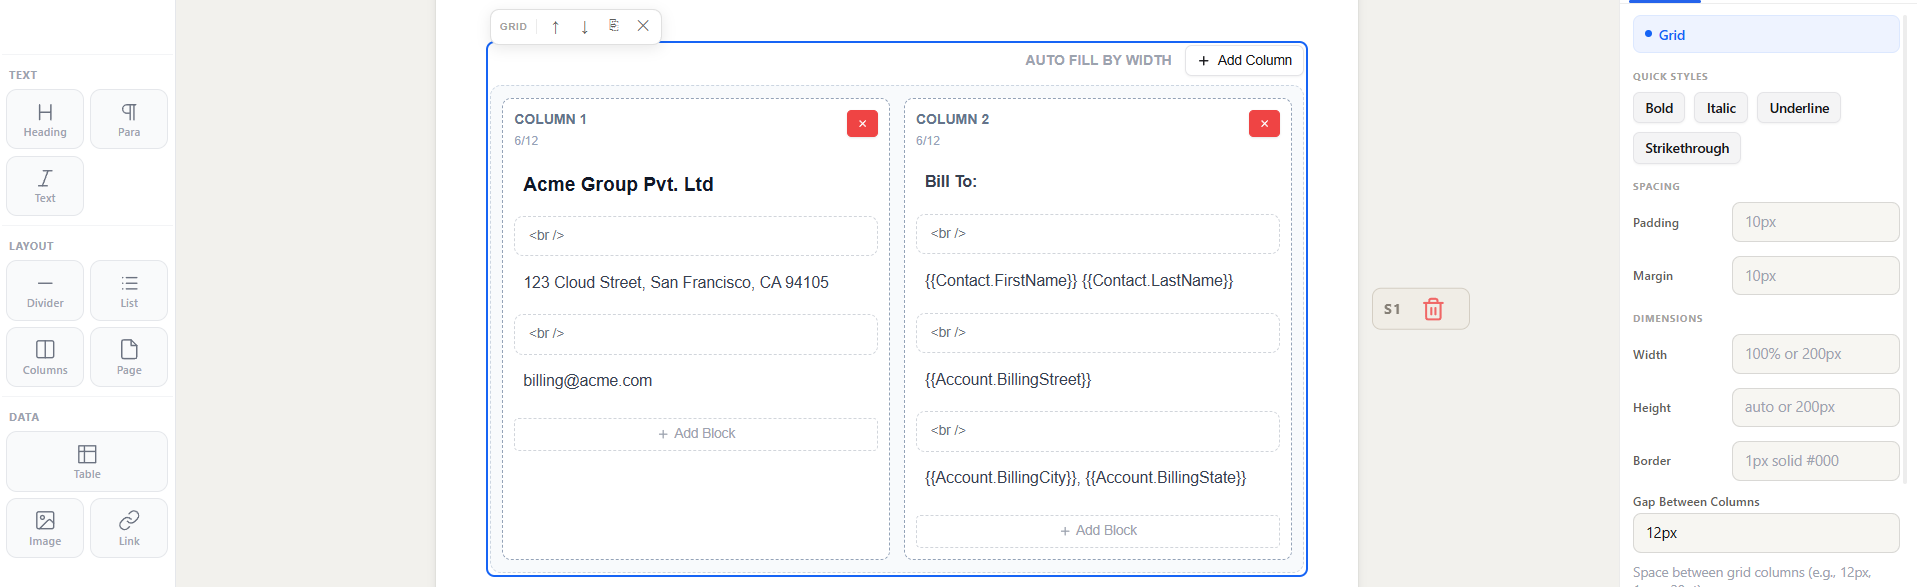 Left column with hardcoded sender details, right column pulling recipient name and address from merge fields.
Page
Splits the document into separate pages in the PDF. Everything above the Page element prints on one page and everything below starts on a new page. Use it anywhere you need the next content to begin fresh — after a summary, before terms, or between sections.
Use case: Keep Terms & Conditions on a separate page from the invoice summary
Steps:
- Add a Section (S1) with a Heading "Invoice Summary" and Para elements for Subtotal, Tax, and Total Due. Use a merge field or type the amount. Type
{{Opportunity.Amount}}to pull the subtotal from the record automatically. - Drag Page from the LAYOUT panel below the Total Due paragraph, still inside S1.
- Add a new Section (S2) below with a Heading "Terms & Conditions" and Para elements for the payment terms.
- Click Download PDF. The Terms & Conditions section will always start on a fresh page.
S1:
  Invoice Summary
  Subtotal: {{Opportunity.Amount}}
  Tax (8.5%): $807.50
  Total Due: $10,307.50
  <page-break />         ← new page starts here in the PDF

S2:
  Terms & Conditions
  Payment is due within 30 days of the invoice date.
  Late payments are subject to a 1.5% monthly interest charge.
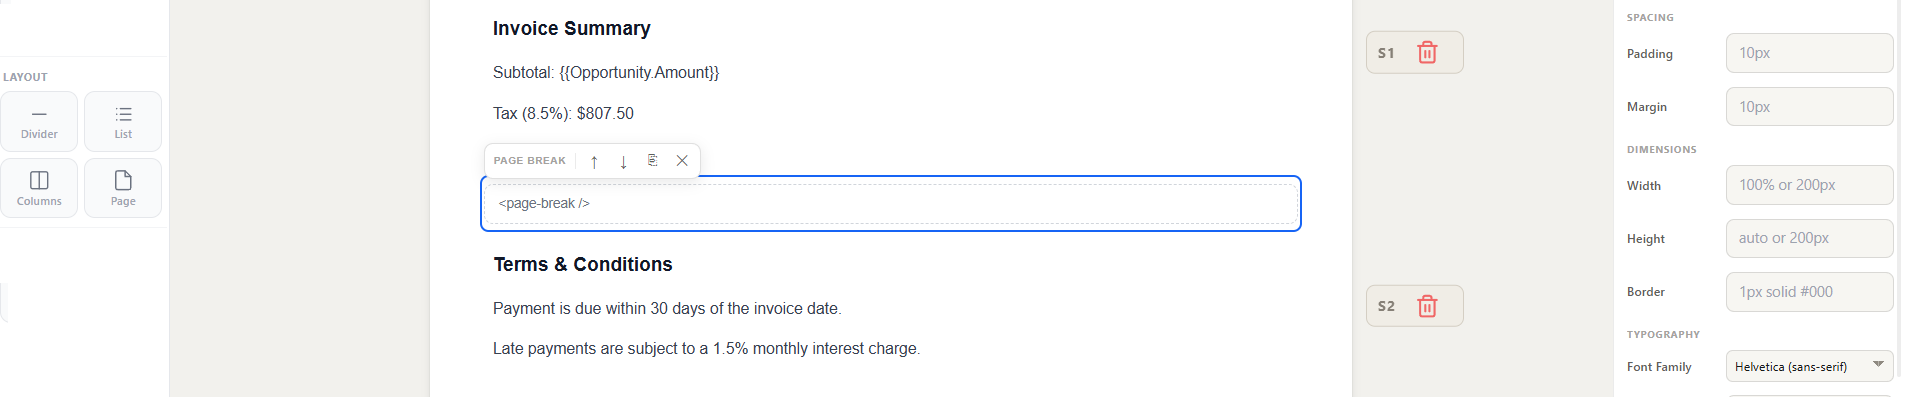 Invoice Summary in S1 with subtotal from
 {{Opportunity.Amount}} merge field and <page-break /> at the bottom, Terms & Conditions in S2 starting on the next page.